
X-Trans V in Detail - Part 3: White Balance, Highlights and Shadows, Dynamic Range
The second post in this series covered three settings that enrich a film simulation already chosen. This one turns to three settings of a different nature, more fundamental in a sense, since they act before the simulation even comes into play, or deeper inside the image rather than on its surface. White balance sets the overall tint before anything else applies. Highlights and shadows redraw contrast, zone by zone. And dynamic range protects the most fragile part of a high-contrast scene: the highlights that disappear first if nothing is done about them.
The Three Settings
White Balance
Light doesn't always have the same color. An incandescent bulb tints everything orange, an overcast sky leans blue, a fluorescent tube adds a green cast that isn't always obvious to the eye. White balance exists to correct that cast and bring whites back to looking like whites, whatever the light source. On the X-Trans V, this setting comes in several forms, from the simplest to the most precise.
The simplest form is automatic, in three variants: AUTO, aiming for a standard balance, White Priority, which pushes toward neutral, cooler whites, and Ambience Priority, which deliberately keeps the warmth of incandescent light rather than correcting it. The official manual is clear on one point: these three modes only really differ under incandescent light. Under other sources, like an overcast sky, the gap between them becomes nearly invisible, a nuance confirmed by Chris Lee's (pal2tech) testing.
For more specific situations, eight fixed presets cover the ground: daylight, shade, three versions of fluorescent, incandescent and an underwater mode that corrects the blue cast typical of diving. A Color Temperature mode also allows a direct setting in Kelvin, for cases where no preset quite fits. And for the most precise situations, three custom measurement slots let you calibrate the camera on the spot, off a gray card or a neutral white object. The camera then confirms whether the reading is good, too dark, or too bright.
Then comes the finest adjustment of all: WB Shift, which layers on top of any of the previous modes, including the fixed presets and the Kelvin temperature. Two independent sliders push the image toward blue or yellow on one axis, and toward red or green on the other, each on a scale wide enough to cover a very large number of combinations. It's a precision tool, useful when the base white balance is almost right but not quite: a stubborn cast in the shadows, for instance, or a gray rendering you want to fine-tune in black and white. As with exposure, it's better to measure than to guess: a reading off a gray card under the actual light remains the most reliable way to know where to push the slider.
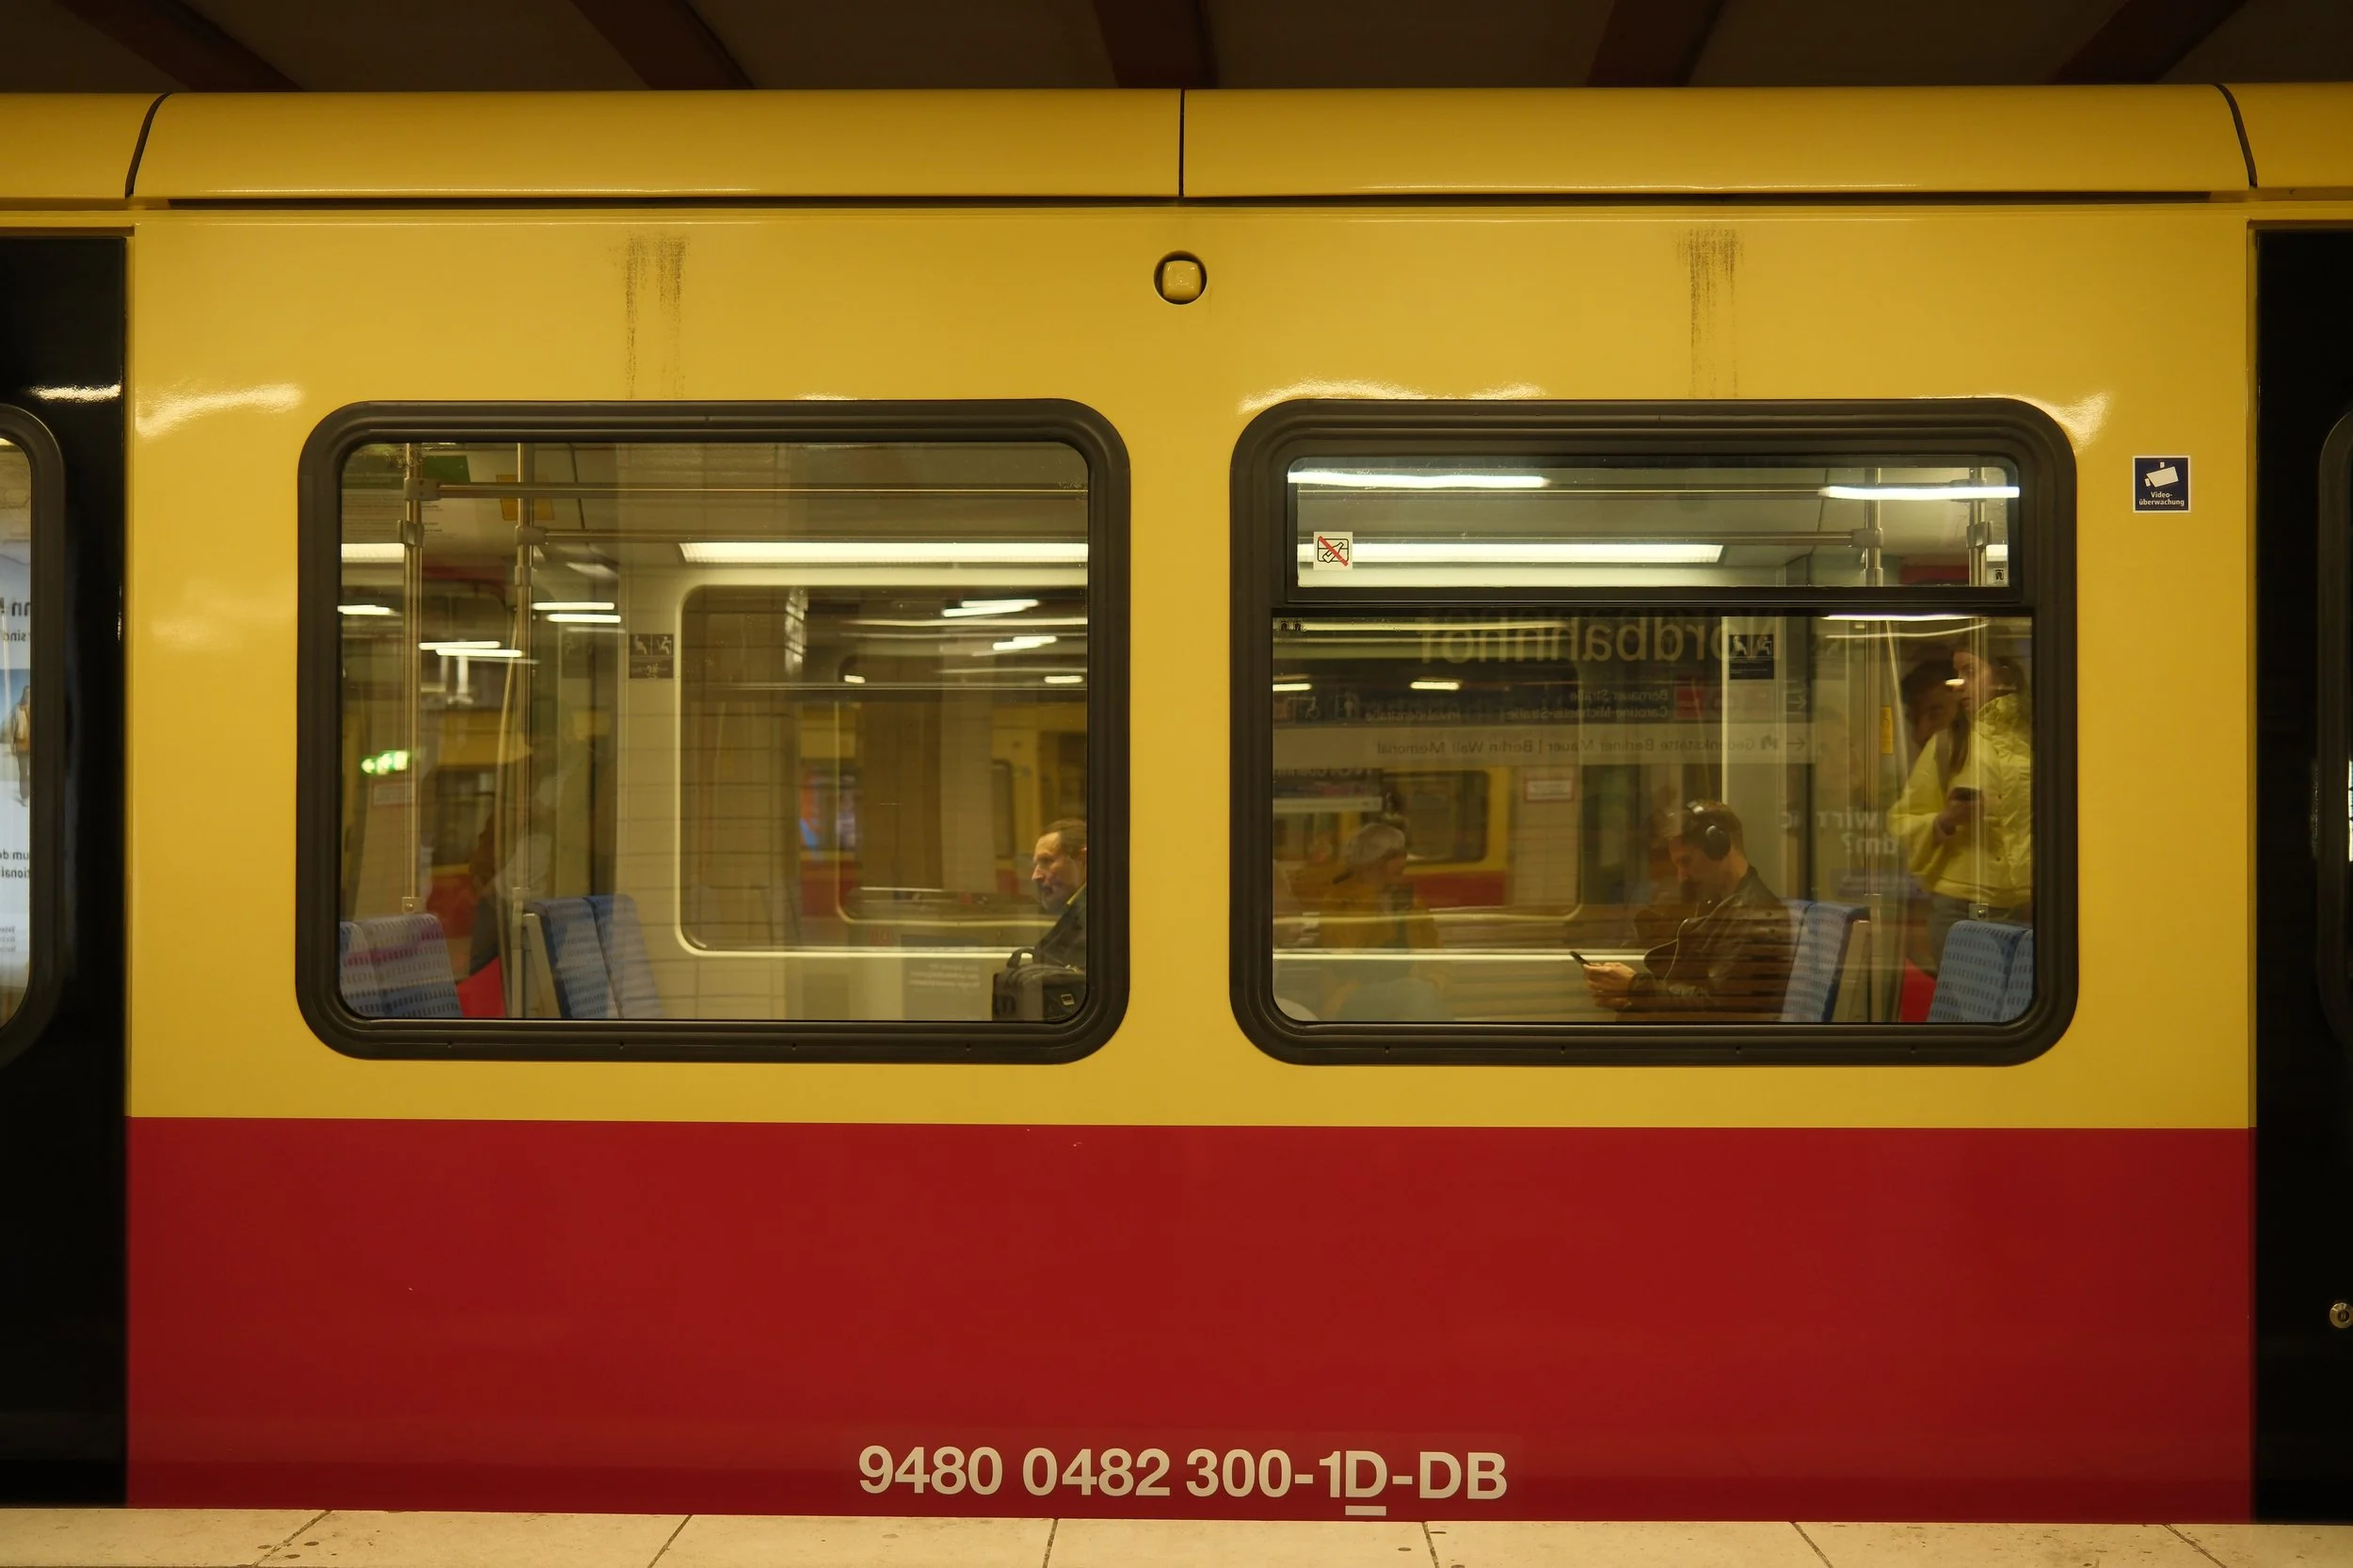
Neutral (WB Shift at 0/0, Reala Ace base)
In this photo, taken inside a car of the Berlin U-Bahn under fairly neutral fluorescent lighting, the R+5/B-5 shift pushes everything noticeably toward magenta and yellow, a deliberately strong example chosen to make the diagonal axis clearly visible. In an actual recipe, you'd aim for a subtler correction, adjusted case by case rather than applied as a rule.
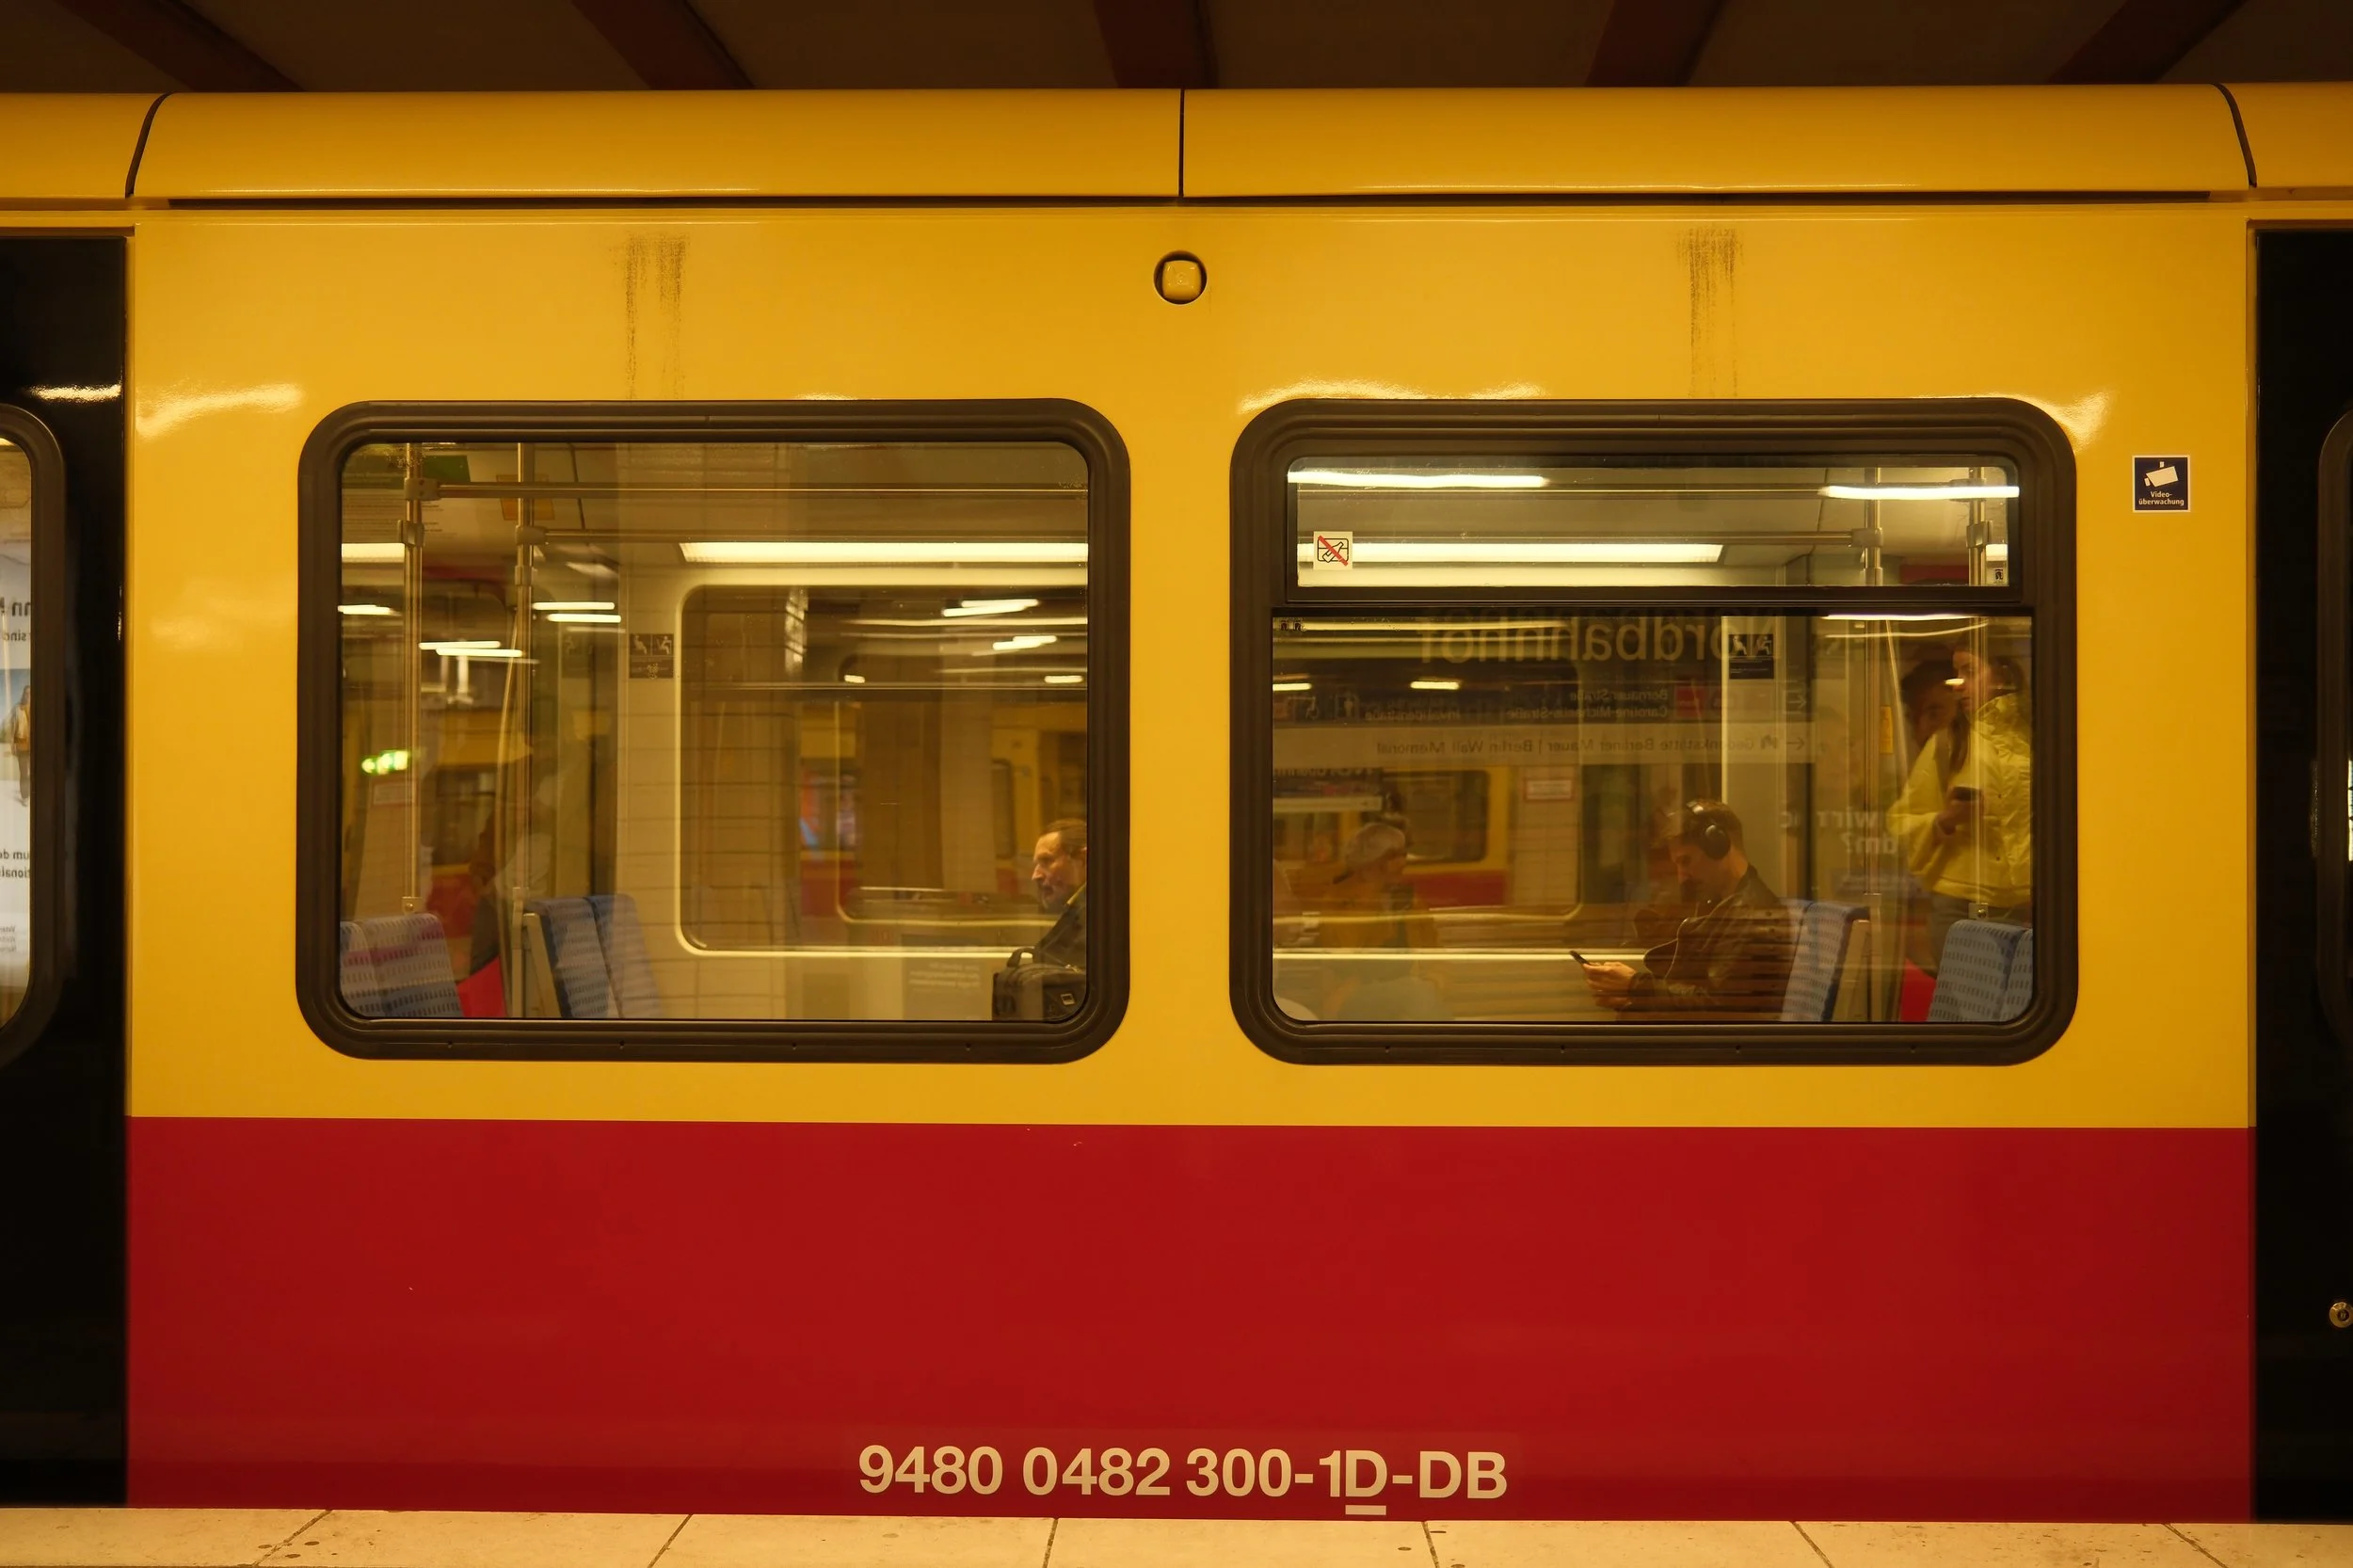
R+5 / B-5 (Reala Ace base)
On the X100V, X-Pro3, X-T4 and every X-Trans V model that followed, a WB Shift setting can be saved into one of the camera's custom presets, ready to recall instead of dialing it in again each time.
Highlights and Shadows (Tone Curve)
Two neighboring sliders, Highlights and Shadows, adjust a photo's contrast, each on its own side: the first acts on the bright areas, the second on the dark ones, independently of each other. On recent models, X100V, X-T4 and every one since, meaning the entire X-Trans V lineup, the two are combined into a single interface, Tone Curve, which displays a real-time S-shaped curve. The deeper it bends, the stronger the contrast.
One useful clarification: these aren't global contrast sliders like you'd find elsewhere, nor the exact equivalent of Lightroom's Highlights and Shadows sliders. They're targeted adjustments. The Highlights slider only touches the parts of a photo that are already bright, the Shadows slider only the parts that are already dark. On an image with not much of either, an evenly gray scene under an overcast sky, say, the effect stays close to invisible.
The logic is easy to remember: pushing a slider positive deepens contrast, with brighter highlights and deeper shadows, while pushing it negative softens things and recovers detail, at the cost of a flatter look. Both sliders in the same direction strengthen or reduce contrast symmetrically. But setting them in opposite directions, Shadows at +2 and Highlights at -1, say, gives a softer, more "filmic" rendering, where highlights fade out gently while shadows deepen a little, a combination that shows up often in film-inspired recipes.
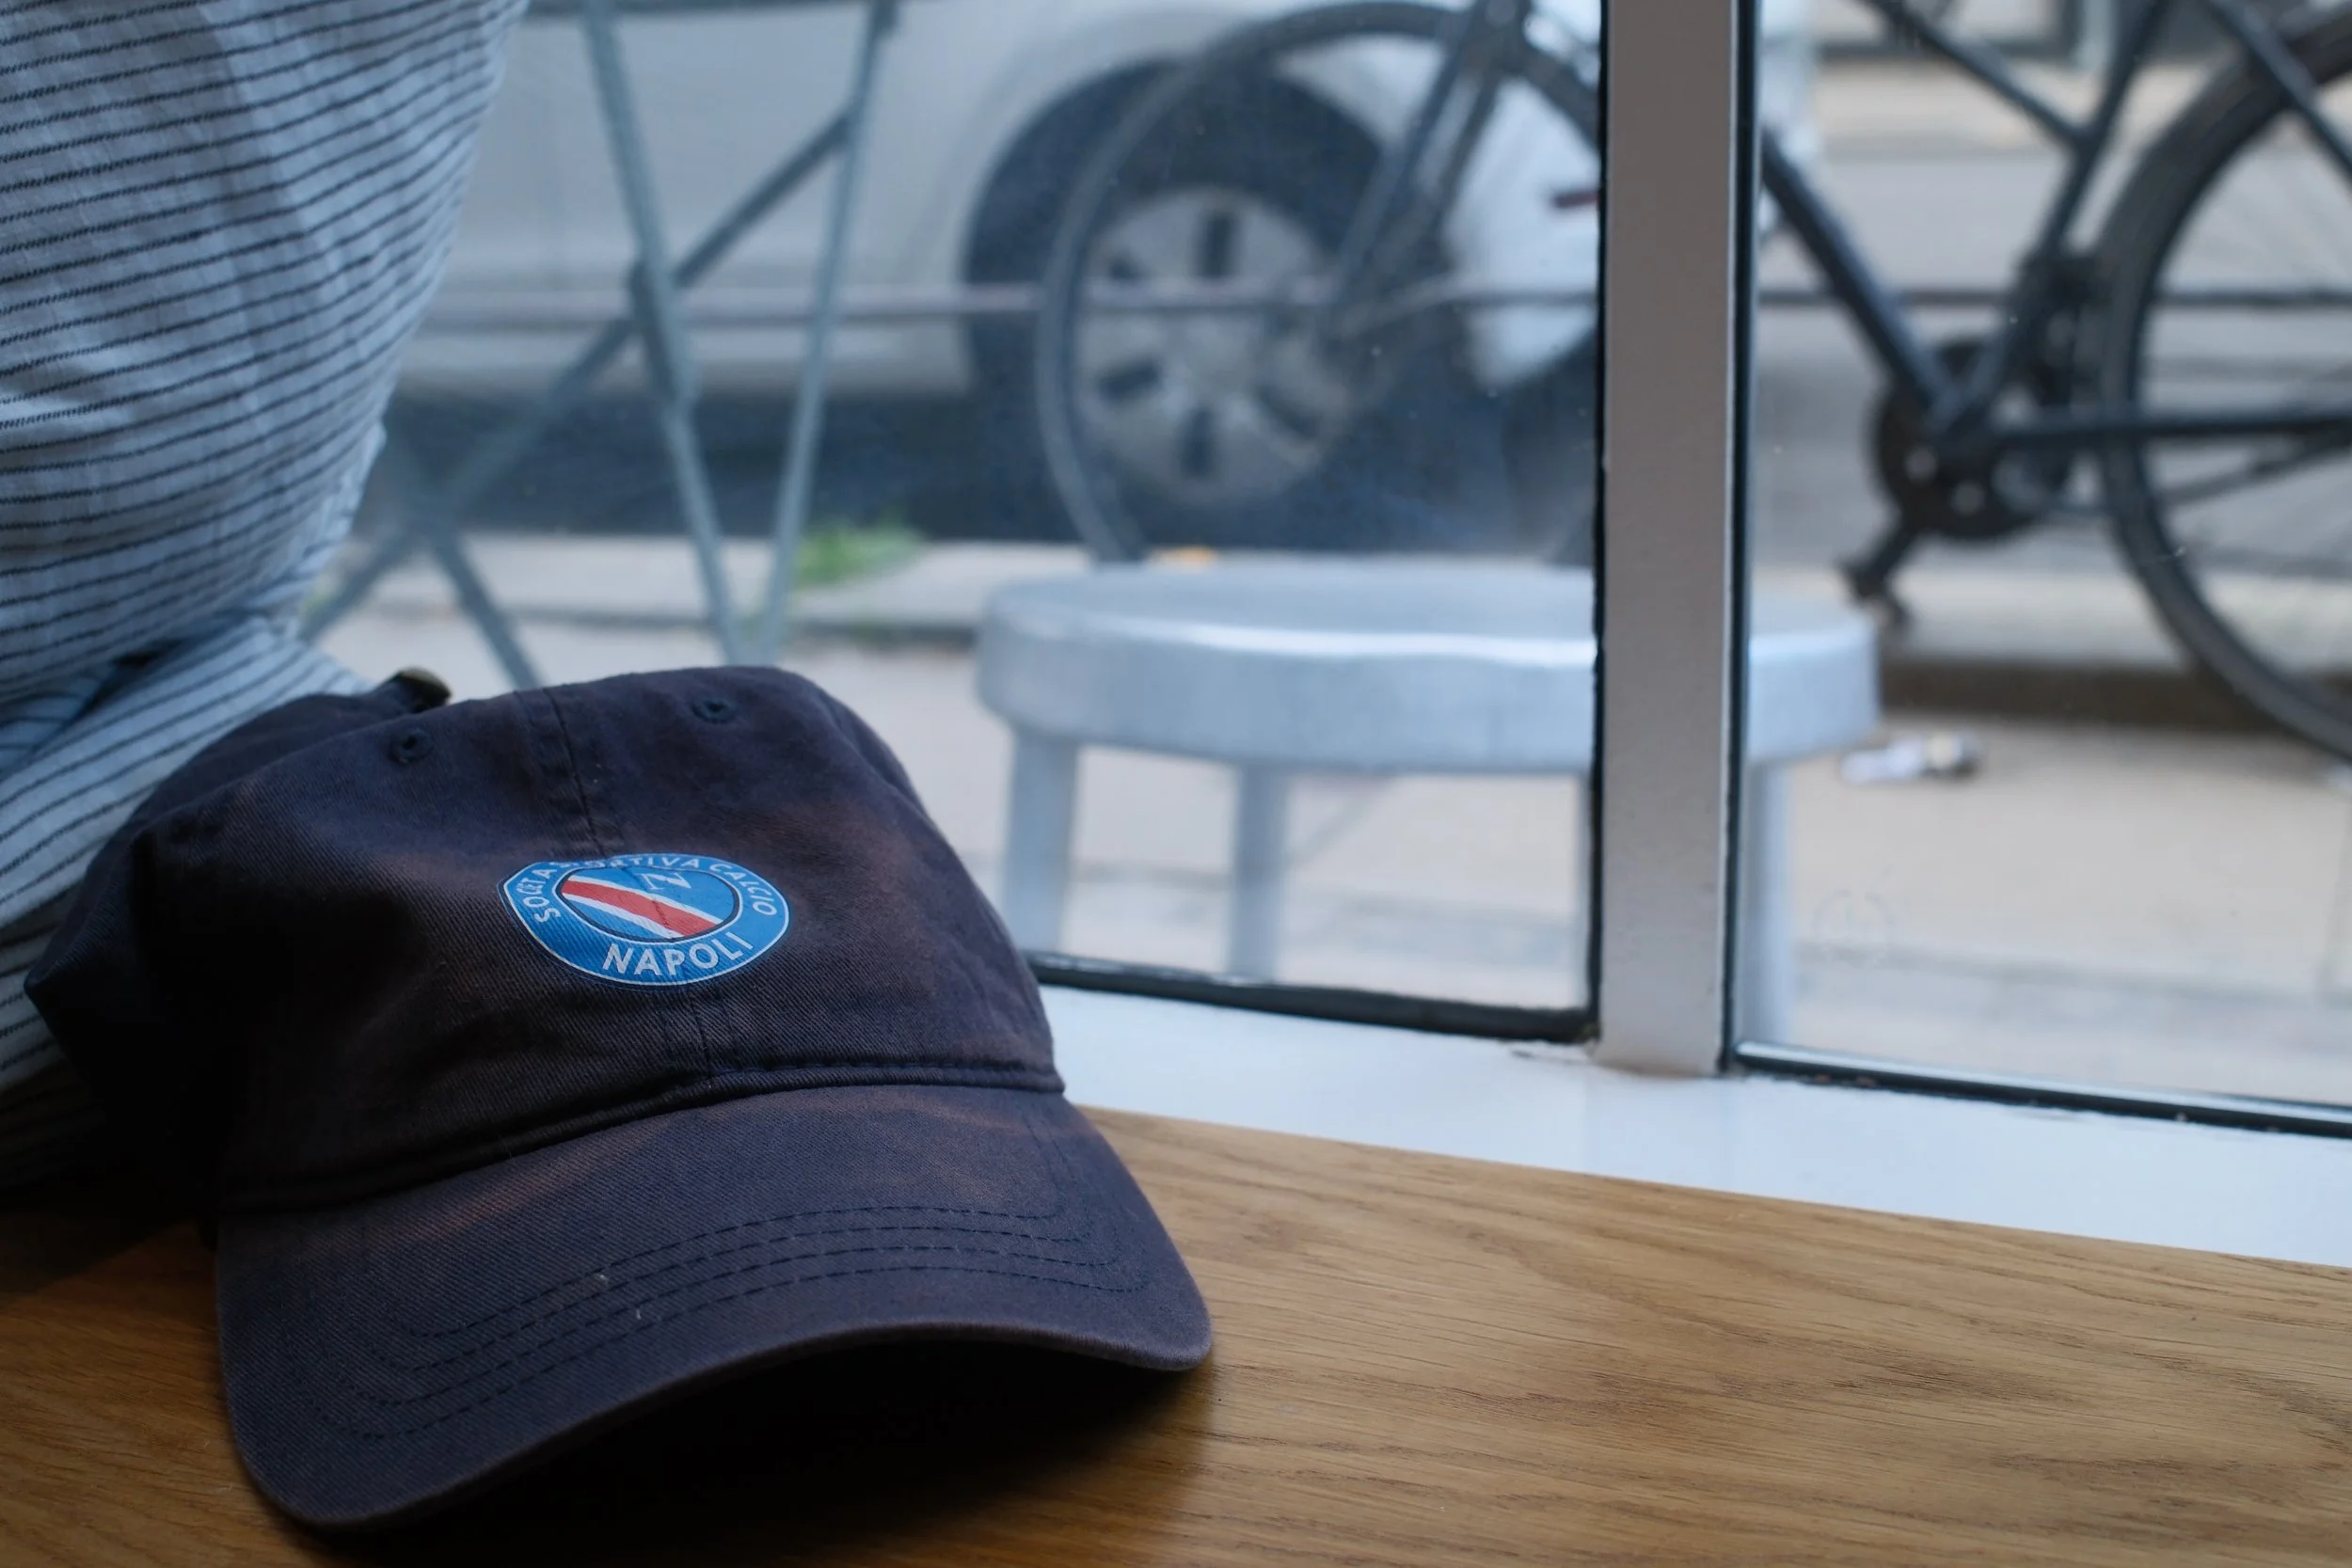
Neutral (0 / 0, Reala Ace base)
In this backlit scene, the window is the frame's only real source of highlights, while the room's interior holds the shadows, but the natural gap between the two was too small to read clearly on screen with the more moderate combination described above. This version pushes both sliders to their extreme values instead, Shadows +4 and Highlights -2, so the Off/With difference is unmistakable: the cap and cushion gain noticeably more detail, while the window light fades out more decisively instead of blowing out to pure white.
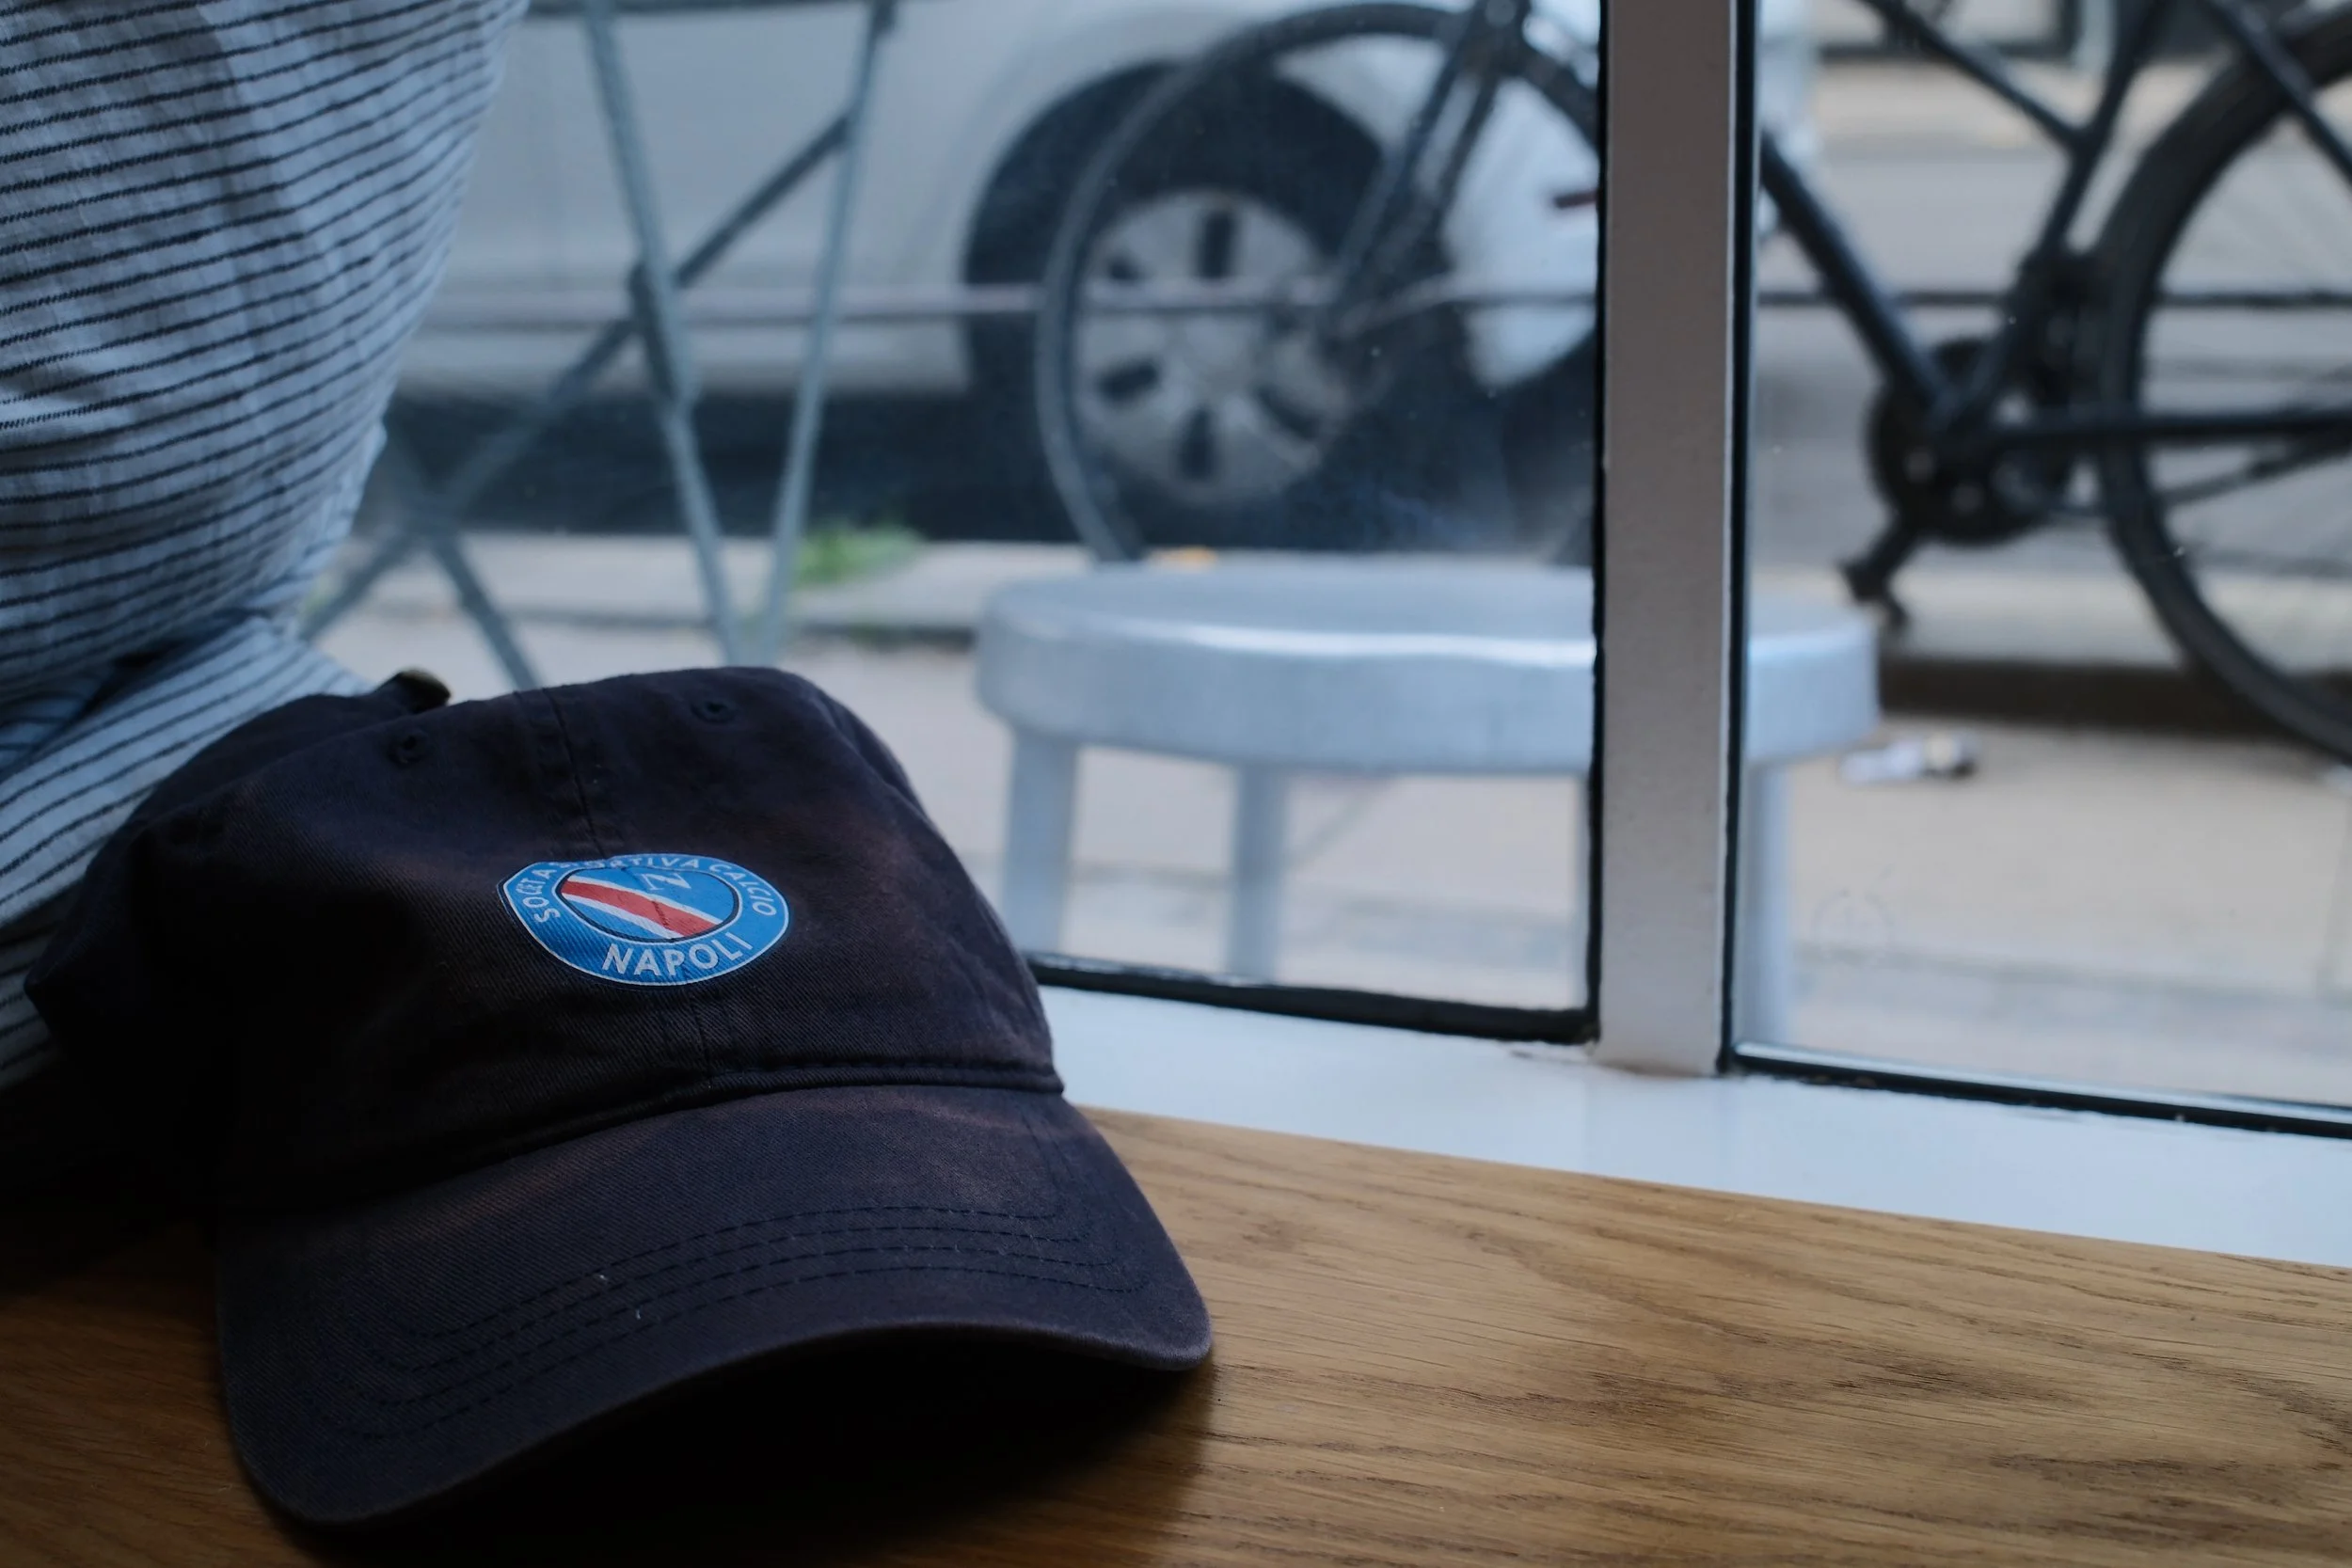
Shadows +4 / Highlights -2 (Reala Ace base)
The result also depends on the simulation in use: Pro Neg. Std has naturally soft shadows, while Classic Chrome or Classic Neg. already carry noticeable shadow contrast before you touch anything. These same curves, as it happens, work behind the scenes in D Range Priority, covered a bit further down. And as with many settings on this blog, it's worth going easy: too strong a positive value can lose detail in the areas it touches, while too strong a negative value on an already well-exposed photo quickly turns flat and washed out.
Dynamic Range and D Range Priority
Dynamic range is a photo's ability to show detail in both the highlights and the shadows at once, without sacrificing one for the other. The X-Trans V offers two distinct ways to extend it, and they never work at the same time.
The first, Dynamic Range, works through a fairly simple trick: the camera deliberately underexposes at the moment of capture, which protects highlights that would otherwise have been lost, then lifts the midtones and shadows during JPEG processing to compensate. DR100 turns it off, DR200 underexposes by one stop and DR400 by two, each level requiring a slightly higher minimum ISO, a logical trade-off since underexposing needs some headroom to avoid a noisier result. Auto mode chooses between DR100 and DR200 depending on the scene, and never switches to DR400 on its own.
One detail worth knowing before heading out to shoot, if you plan on reworking your RAF files later, in-camera or with X Raw Studio: the Dynamic Range level chosen at the moment of capture stays locked into the RAW file. It's a direct consequence of how DR200 and DR400 actually work, withholding part of the analog gain right at capture rather than correcting for it afterward, which means you can only step down a level from there, never back up. A photo shot at DR400 can be reprocessed at DR400, DR200 or DR100 depending on the look you're after, one shot at DR200 only at DR200 or DR100, and one shot at DR100 stays there, no exceptions, a constraint John Peltier says he runs into often enough in his own use of X Raw Studio. In practice, it's better to err on the side of caution in the field: shooting at DR400 keeps every door open for reprocessing, provided you accept the minimum ISO of 500 that level requires on the X-Trans V. It's a reflex that isn't far from film photography: knowing a stock runs hot in the highlights, or tends toward dense shadows, a photographer will sometimes rate it at an ISO different from the one printed on the cartridge, depending on the day's need, and adjust development accordingly. The X-Trans V essentially does the same thing, but in a single gesture, at the moment the shutter fires.

DR100 (Reala Ace base)
In this photo taken on the Amalfi coast, the sky near the sun is completely blown out at DR100, the clouds losing all texture into a flat white mass. At DR400, that same area regains volume, even revealing a jet contrail that had vanished entirely in the DR100 version, without darkening the rest of the image.

DR400 (Reala Ace base)
The second way, D Range Priority, goes further and works differently: set to Weak, Strong or Auto, it fully replaces Dynamic Range and the Tone Curve, which become unavailable while it's active. It combines, in a single function with no visible adjustment, the equivalent of Dynamic Range's underexposure and a highlight/shadow adjustment, but applied more broadly across the whole image rather than targeted at highlights alone. Those familiar with the setting, like Ritchie Roesch (Fuji X Weekly) and John Peltier, note that Weak lands close to DR200 and Strong close to DR400, with this nuance: the compression touches the whole image rather than just the highlights, for a generally flatter rendering, especially at Strong. The setting actually traces back a fair way in Fujifilm's history: its principle echoes the old Frontier lab scanners, originally designed to bring underexposed color negatives back to life.
In practice, Dynamic Range remains the more useful choice for building a recipe: it protects highlights predictably, while still leaving the Highlights and Shadows sliders adjustable by hand for everything else. D Range Priority suits extreme situations better, where a flatter look is preferable to losing detail. Neither setting lets you drop below the minimum ISO required for a given level of effect, and in controlled light, when you want to keep the base ISO, the simplest solution is often just to leave both off.
Going Further
White balance sets the tint before a simulation is even chosen. Highlights and shadows redraw contrast, zone by zone. Dynamic range protects the most fragile part of a high-contrast scene. Three settings that act earlier or deeper than the ones in the previous post, but with the same idea behind them: understand what they actually do before folding them into a recipe. The fourth and final post in this series will turn to color, sharpness, clarity and noise reduction.
— Louis-Martin Ouellet
This blog's ten recipes — the seven CW and the three NS — all live in the Recipe Cellar, a space where they simply wait to be discovered.